(10) Upgrade Azure AD Connect to Version 2.1.1.0
- Mr B SOE way
- Jun 18, 2022
- 2 min read

I recently finished up a project for a customer with doing a lift and shift with Azure AD Connect.
Customer's old setup - running Azure AD Connect Version 1.4.32.0
Server A (Old Active or Production Server) running Windows Server 2012 R2
Server B (Old Staging Server) running Windows Server 2012 R2
Customer's new setup - will be running Azure AD Connect Version 2.1.1.0
Server C (New Active or Production Server) running Windows Server 2019
Server D (New Staging Server) running Windows Server 2019
Note: With Azure AD Connect Version 1.4.32.0 or lower than that of 1.5.x will not have the GUI function to see "Export Settings" from the Active or Production Server.
The following below will be a step by step:
1. On the new Server D, download and install the latest version of Azure AD Connect: https://www.microsoft.com/en-us/download/details.aspx?id=47594 which is currently 2.1.1.0 (April 2022).
2. On the new Server D, run the installer, don't proceed with the wizard on the new server. Navigate to C:\Program Files\Microsoft Azure AD Connect\Tools and copy the MigrateSettings.ps1 and copy that PowerShell script over to Server A (Old Active Server) in the same folder location: C:\Program Files\Microsoft Azure AD Connect\Tools

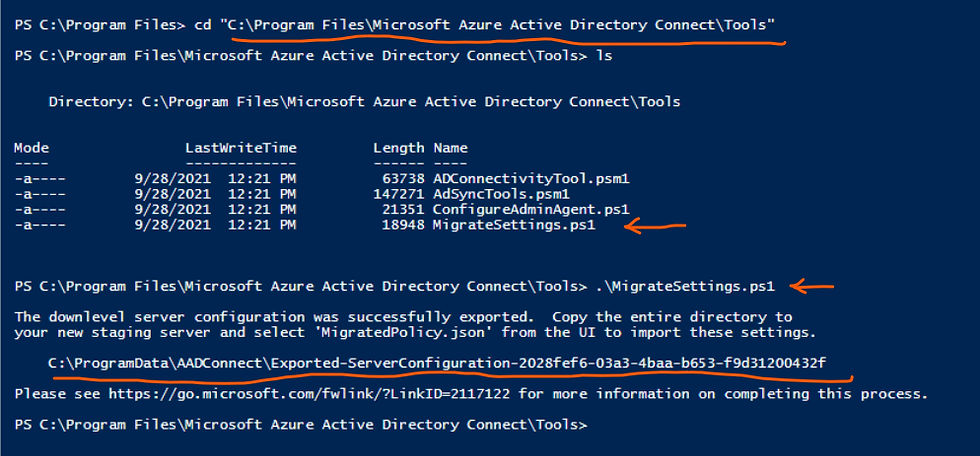
3. On the new old Server A (Old Active or Production Server), run PowerShell as admin. Enter the following:
CD "C:\Program Files\Microsoft Azure AD Connect\Tools"
ls > to list what file are there.
.\MigrateSettings.ps1 > this will then export a "Exported-ServerConfiguration" folder.
4. Next copy the "Exported-ServerConfiguration" folder over to the new Server D (New Staging Server). As the wizard hasn't been run, select Customize and enter the required path of where the "Exported-ServerConfiguration" folder is located at. Then select Install

5. Under Azure AD Connect, log in with an account that has Global Administrator or Hybrid Administrator credentials.
6. Under Connect Directories, use an existing account to configure the directory.
In this case, use the same account that was previous on Old Active Server A with MSOL_xxxxxxx
In case you have multiple domains like this customer, do the secondary domain first followed by the first domain. Once that shows succeeded, proceed to the next.
7. Under Configure, ensure Enable staging mode is selected, this is to avoid exporting any data to AD or Azure AD. Select Install.

8. To ensure synchronization works, ensure to log off and log back on then monitor the Synchronization Service Manager.
9. Wait 24 hours then proceed on to the next phase which is to decommission Azure AD Connect on the old Staging Server B.

10. Wait another 24 hours to ensure there are no hiccups. By navigating to https://portal.azure.com then Azure AD Connect Health, you will be able to view for alerts that are picked up.
11. To migrate over to the new Active Server C, do the same Steps 3 to 8. Once those steps are done, ensure to Enable Staging Mode on Old Active Server A this is to avoid any synchronization taking place. This would then set the following:
Server A (Old Active or Production Server) in staging mode
Server B (Old Staging Server) in decommission mode
Server C (New Active or Production Server) in active mode
Server D (New Staging Server) in staging mode
12. Once the migration is done, to ensure synchronization works log off and log back on then monitor the Synchronization Service Manager.
13. Wait another 24 hours before decommission the old Active Server A.


Comments