(22) Create a Windows 365 Demo Tenant
- Mr B SOE way
- Oct 15, 2022
- 2 min read

Updated: Oct 20, 2022
Lately I have been focusing on alot of projects in relation for Windows 365. To ensure I am up to speed with technology, this is by far the quiest way to obtain more knowledge.
By using https://cdx.transform.microsoft.com, you can create various test tenants to evaluate the different solutions offered by Microsoft.
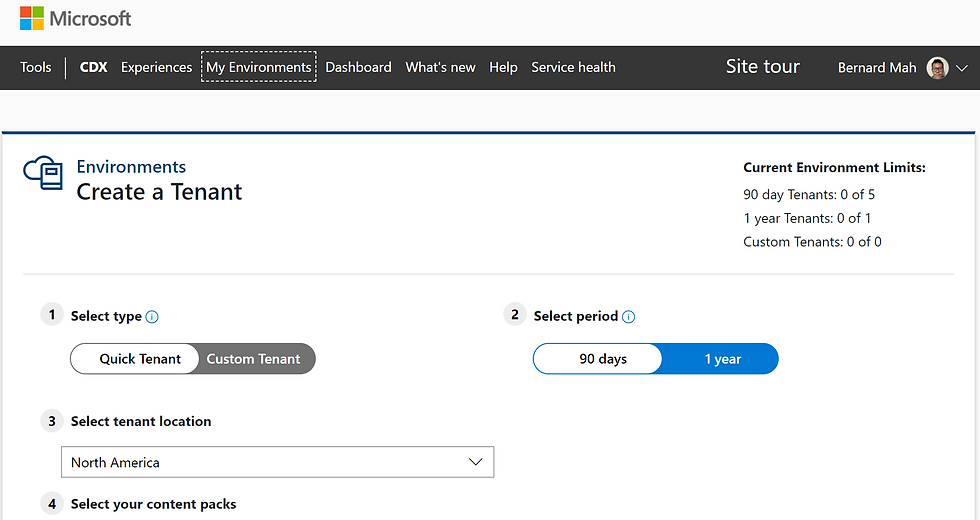
Tenant Creation
1. Navigate to https://cdx.transform.microsoft.com/
2. Select My Environments
3. Then select Create Tenant

4. Select the following
Select Type: Quick Tenant
Select Period: 90 days
Select Tenant Location: North America
5. Scroll down till you see "Windows 365 Enterprise Demo Tenant". Select on Create Tenant

6. Under terms of use, tick the box and select Accept and Continue.

7. Wait for the tenant to load.

8. It will generate with the email login details and password.

9. Now it's time to test, since it's Windows 365, we navigate to https://endpoint.microsoft.com, enter the required credentials provided.


10. Now we are logged in successfully to the tenant.

11. Select Devices then under Provisioning, select Windows 365.

12. As you can see, nothing has been configured.

13. To setup Windows 365, we need to decide on whether it will be a on-premises network or pure Azure AD network. In this example, it will be an Azure AD network.
Select Azure network connection then select Azure AD join.

Create the Azure AD Join Connetion, as there is a demo tenant there is no subscription available for trial use.

14. Next you need to make sure the user is licensed.
This can be done by going to https://admin.microsoft.com/Adminportal then expand Billing then select Licenses. Click a license and assign to the end user or group.


15. Next, select Provisioning Policies
Enter the following:
Name: Policy Name
Description: Optional
Join Type: Azure AD Join
Network: Microsoft hosted network
Region: Optional choice.
Then select Next.

16. Under Image, select Gallery Image (as it's always up to date). With Custom, you have to ensure it is up to date.

The choices that are available for the Galley image are as follows. For this I have selected Windows 11 Enterprise + Microsoft 365 Apps 22H2

17. For Configuration, I have selected Language as English (United Kingdom) as that is similar that of English (Australia).

18. For Assignments, I have selected the Windows365 Enterprise Group (where I have added the demo account) in there.

19. Select Create, once everything is finalised. The provisioning policy is generally really quick, at times it can take up to 15 to 30 minutes.

20. Now it will begin provisioning.


Comments