(3) Getting Started with Security Defaults, Conditional Access and MFA (Multi Factor Authentication)
- Mr B SOE way
- Oct 16, 2021
- 3 min read

This post will cover with setting up in the following:
- Disabling Security Defaults
- Setting up Dynamic User Group
- Setting up Conditional Access
- Setting up MFA (Multi Factor Authenticator)
- Setting up MFA on Microsoft Authenticator App
Disabling Security Defaults:
1. To disable security defaults, navigate to https://portal.azure.com/
2. Select Azure Active Directory, scroll down and select Properties then select "Manage Security Defaults" at the bottom

3. Under Enable Security defaults, select "No" then select "Save"

Setting up Dynamic Users Group:
Before we setup Conditional access, we need to setup a dynamic user security group. Then we can target our Conditional Access policies against those groups.
1. To disable security defaults, navigate to https://portal.azure.com/
2. Select Azure Active Directory, select Groups

3. Select "New Group", then enter the following:
Group Type: Security
Group Name: AAD-All-Staff
Description: All Staff Members
Azure AD roles can be assigned to the group: No
Membership type: Dynamic User
Dynamic user members: Select Add dynamic query

4. You can configure the rules by using the rule builder or rule syntax, if you decide to use the rule builder, it will prepopulate the query below.

5. For this, I will be using the Rule Syntax, by selecting "Edit" at the right, and entering:
(user.userType -eq "Member"), this will simply obtain all user accounts that have a User Type as "Member", select "OK"

6. Then click "Save".

7. Next the dynamic user group has been created.

Here is a list of Azure AD User Dynamic Groups you can setup:
Create a group that is a current member and part of the Automation Department
(user.userType -eq "Member") and (user.department -eq "Automation")
Create a group that is in Australia and user account is enabled
(user.country -eq "Australia") and (user.accountEnabled -eq true)
Create a group that has members active, but excluding UPN: Bernard.Mah@soetunedevice and does not contain any Emergency accounts
(user.userType -eq "Member") and (user.userPrincipalName -notContains "bernard.mah@soetunedevice.com") and (user.userPrincipalName -notContains "Emergency")
Create a group that only shows all guests
(user.userType -eq "Guest")
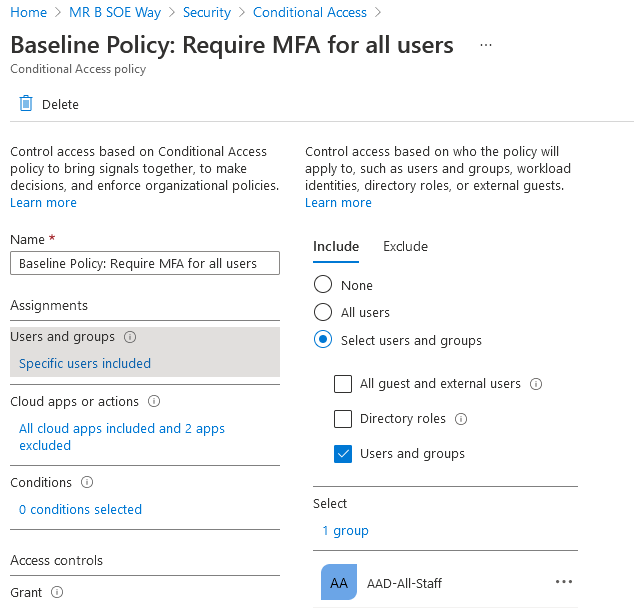
Setting up Conditional Access:
As we have setup our Dynamic User Group, now it's time to setup our Conditional Access Policy.
1. To disable security defaults, navigate to https://portal.azure.com/
2. Select Azure Active Directory, select Security then select Conditional Access.

3. Select "New Policy"

4. Enter in the following:
Name: Baseline Policy: Require MFA for all users
Assignments: Select the group that was created earlier: AAD-All-Staff
Cloud Apps or actions: All cloud apps except Microsoft Intune and Microsoft Intune Enrollment.
Grant: Select "Grant Access" and select "Require multi-factor authentication" And select "Require one of the selected controls"
Enable Policy: Select "On"
The other types of Conditonal Access Policies you can create are, which I will cover another time.

Setting up MFA:
1. To setup MFA, navigate to https://portal.azure.com/
2. Select Azure Active Directory, select Users
3. Next select "Per-user MFA"

4. This will open a new tab within your browser, and you will see this:

5. Tick the "Box" and select will "enable" on Multi-Factor Auth Status

6. Select Service Settings and make the required changes. Then click "Save"

Setting up MFA on Microsoft Authenticator App:
1. By navigating to https://portal.azure.com/ on another browser, you wlll be prompted.
2. Under Start by getting the app, depending on your mobile phone platform.
Select "Next".

3. Under Set up your account, select "Next".

4. From your mobile phone device, scan the QR code.

5. Depending what was setup in MFA settings, approve by notification sent to the app.

6. Select "Next".

7. Next enter your mobile phone number, select the country code followed by your phone number. Then select "Next"

8. Once verified, select "Next".


Comments