(2) Getting started with Microsoft Azure Branding, Enterprise State Roaming & SSPR
- Mr B SOE way
- Oct 1, 2021
- 2 min read

The first post covered setting up a free Microsoft Azure Developer Tenant, you can click here to view it the post.
This post will cover with setting up in the following:
- Company Branding
- Enterprise State Roaming
- Self Service Password Reset (SSPR)
Company Branding:
1. To configure Company Branding, navigate to https://portal.azure.com/
2. Select Azure Active Directory by searching via "Search resources, services and docs" at the top or from "Azure Services" when you first login.

3. Scroll all the way down, select Company Branding and select "Configure"

4. Under Company Branding, insert the following that you want to display:
- Sign-in background and banner logo
- Sign-in page text
Under the advanced options, you can enter the desired company branding as well as sign-in background colour and more options. Then save the changes.

5. Next go to https://portal.azure.com/ then Azure Active Directory then Properties. Change the properties of name then click Save

Enterprise State Roaming:
1. Next go to https://portal.azure.com/ then Azure Active Directory then Devices then select Enterprise State Roaming then select All then select Save.

Self Service Password Reset (SSRS):
1. Next go to https://portal.azure.com/ then Azure Active Directory then Password Reset

2. Select Properties
3. Under Self service password reset enabled, select All then click Save.
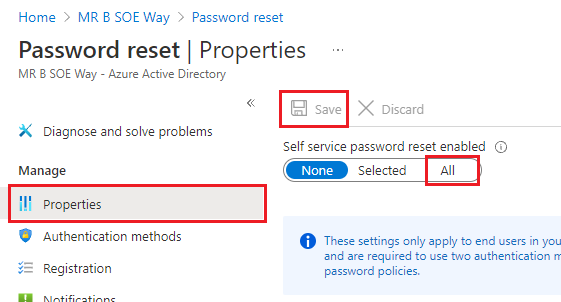
4. Select Save
5. Select Authentication Methods, under the following:
Number of methods required to reset: 2
Tick the following methods available to users: Mobile app code, Email, Mobile Phone
Then click Save

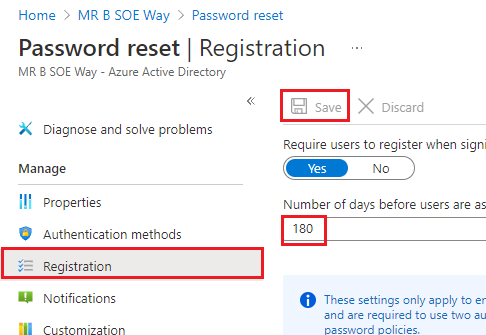
6. Select Registration, make sure the number of days is set to 180 days then click Save.
7. Select Notifications, select "Yes" Notify all admins when other admins reset their password. Then click Save.

8. Select Customization, select "Yes" for "Customize helpdesk link" and enter a URL or email under "Custom helpdesk email or URL" then click Save.


Comments