(92) Azure Virtual Desktop Setup
- Mr B SOE way
- Oct 9, 2023
- 2 min read
Updated: Oct 18, 2023
As I don't want to setup a virtual machine on my desktop then connect it via Intune, I thought why not setup a basic AVD with the subscription I have available. The following below will cover the setup process with AVD.
What is Azure Virtual Desktop?
The Azure Virtual Desktop is an Azure service that allows you to manage your:
VDI (Virtual Desktop Infrastructure)
or RDSH (Remote Desktop Session Host) in the cloud.
Another thing that Microsoft announced is the multi-user Windows 10 experience which allows you to log remotely into Windows 10 multiple users.
As you might know, if you have Windows 10 running up your devices, there is a limit of one user, so either you use it physically, working at that computer, or you connect remotely into it.
With AVD on Azure in the Windows 10 Enterprise edition, you can now set up a multi-session Windows 10 deployment.
AVD (Azure Virtual Desktop) comes optimized for Office 365 continuous integration. However, Microsoft had challenges related to caching apps like Outlook, for example. These apps rely heavily on caching which was a major issue they had to address in non-persistent environments.
They addressed this with AVD, and now you can use your Office 365 easily and flawlessly as a virtualized app – withAzure AD identities as an authentication method.
Virtual Network Setup
1. Copy this URL and paste it in a new tab to create the virtual network setup - real basic
2. Make sure to create a resource group, example: rg-avd-eastus-001. Select Review + Create.

After a creation of the virtual network, I updated the DNS Servers.

Using 8.8.8.8 and 8.8.4.4 then select Save.

Azure Virtual Desktop Setup
1. Navigate to https://entra.microsoft.com/ then Azure Virtual Desktop, select Create a host pool.
Add a host pool name and location. Under the host pool type, select personal. The assignment type should be set to Automatic.

2. Select Next: Virtual Machines then enter the name prefix, availability options/zones, security type, image, number of vms, OS disk type, boot diagnostics, which vnet to use, join to Microsoft entra and an administrator account then select Next.

3. Once happy, select Review + create.

4. Creation takes about 20 to 30 minutes.

5. Once this is done, head over to Application Groups as well as the session pools and update the assignments.


Connecting to AVD
1. Now that AVD is all ready, you can navigate on a browser to https://client.wvd.microsoft.com/arm/webclient/index.html and login with your UPN details.

2. Login with your UPN details.

3. If you encounter this error, please do the following:

Connecting to AVD - Remediations:
Host pools:
Select the hostpool
Select Settings -> RDP Properties
Select Advanced
Add to the properties ;targetisaadjoined:i:1

IAM:
Select Virtual machines
Select Access control (IAM)
Select Add > Add role assignment
Search for Virtual Machine User Login then add user


4. Repeat steps 1 to 3, now this time it will login and create your profile.

5. Global Secure Access will appear, a post that was covered here. https://soeintunedevice.wixsite.com/home/post/84-microsoft-entra-internet-access

6. To continue on Global Secure Access, you can view:


More logs here:

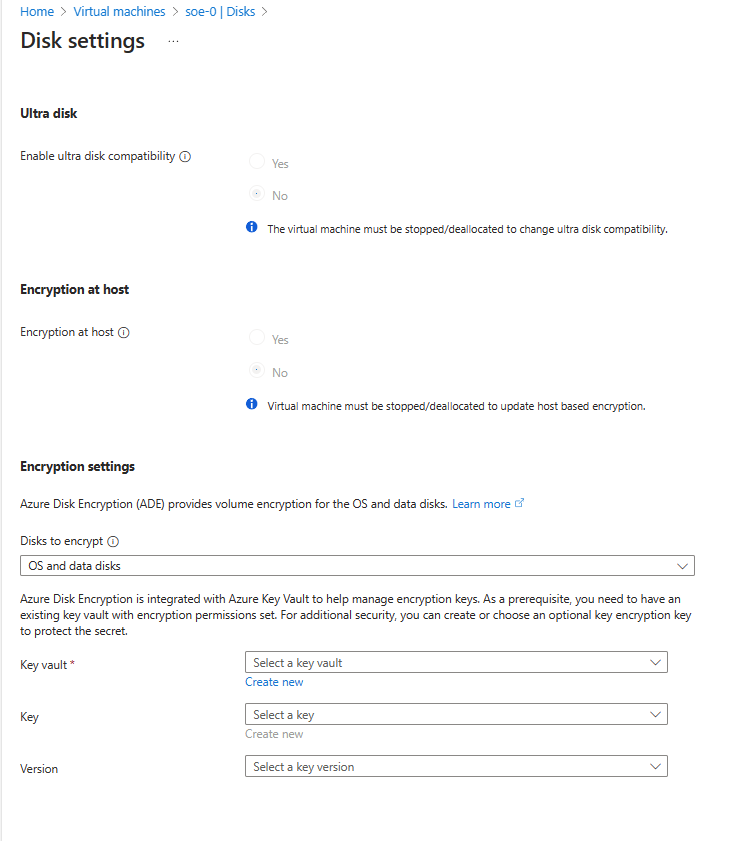
7. If you decide needing to encrypt your AVD, this has to be done under Virtual Machines.
Select Additional settings

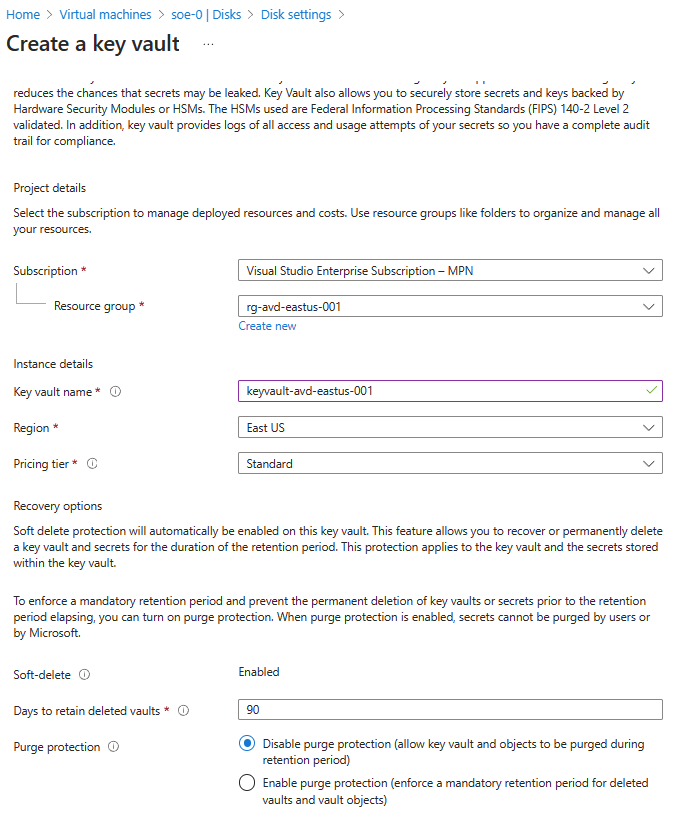
You will need to create a key vault, click on Create new.

It will navigate with creating a key vault section.

Select what is recommended.

For networking, I am setting as default as it is a lab environment.

Select Create.

Once created, select create new under key. Then select Create.

Once done, select Save.


Comments