(213) Microsoft Intune - Cloud PKI with SaaS RADIUS for Enterprise Wi-Fi

A customer reached out to me last week as they are moving to a new office with setting up Enterprise Wi-Fi using Cloud PKI. I stumbled along with https://www.keytos.io/ where the pricing lined up with the customer's expectations.
Create Cloud PKI Certs
Create the Cloud PKI by going to https://intune.microsoft.com/ then select Tenant Administration then select Cloud PKI
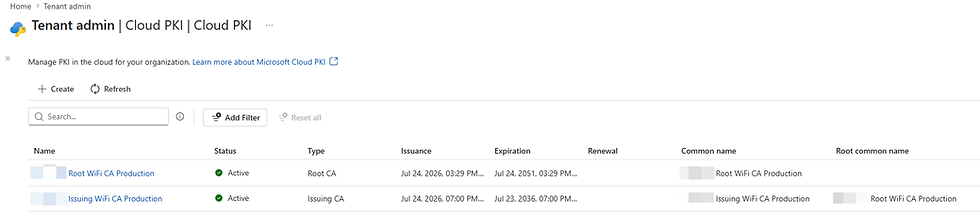
For testing purposes, use CA keys: Software
For production rollout, use HSM keys
Create Root CA

Under Configuration Settings:
CA Type: Root CA
Validity period: 25 years
CA keys: Hardware security module (HSM)
Extended Key Usages: Select Server Auth, Client Auth and Code Signing
Subject Attributes: Common name (CN): Root CA

Encryption Key size and algorithm: RSA-4096 and SHA-512

Then select Review + Create then select Create.

Create Issuing CA
To create the Issuing CA, you have to wait between 2 to 3 hours for it to be picked up.
Under Basics, give a name of your issuing CA:

Under Configuration items, it takes 2 to 3 hours for the newly Root CA to appear: CA type: Issuing CA
Root CA source: Intune
Root CA: Click on the suggested Root CA within the tenant
Validity period: 10 years

CA keys: Hardware security module (HSM)
Extended Key Usages: Select Server Auth, Client Auth and Code Signing
Subject Attributes: Common name (CN): Issuing Root CA

Encryption is already set and greyed out to RSA-4096 and SHA-512 which is inherited from Root CA.

Under Review + create, select Create.

Click on Root CA, select Download.

Click on Issuing CA, then select Download and make a copy of your SCEP URI

EZRADIUS (SaaS Radius) Setup
After that follow the articles Registering the EZRADIUS App in Your Tenant | Keytos Docs within Azure then select your plan: How to Create a Cloud Radius Service in EZRADIUS | Keytos Docs. Once you have access to your dashboard, navigate to 'Settings'
It will pre-define the Radsec IP addresses.
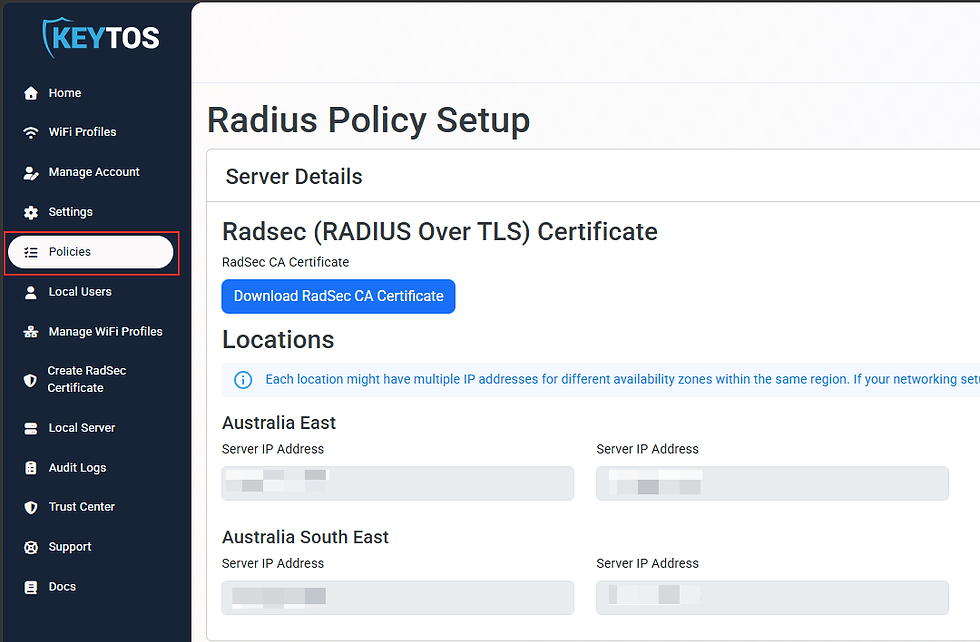
Under Policy Details, you enter a new name like: Enterprise WIFI Profile then select Enable classic RADIUS. When Classic RADIUS Allowed IP Addresses - the IPs and Shared Keys need to be coming from on-prem infrastructure (in this case, customer was using Fortigate Firewall).

Next under 'Accepted Certificate Authorities', under Certificate Source, select Local CA. Note: You must convert the .cer into base64 for it be uploaded. You can simply run:
certutil -encode "Input_Certificate.cer" "Output_Certificate.cer"Once converted to base64, it will look like this:

When uploading the Root CA, select "Is Root CA"

When uploading the Issuing CA, untick the box "Is Root CA". Once the certificates have been uploaded, you will notice there is a green tick against the Root CA.

Under Server Certificate, you have the option to use the vendors, Local CA or Auto-generated certificate. For this we have selected Auto-generated Certificate. Select both "Download CA Certificate" for Root CA and "Download Certificate" for Download Certificate.

The certificates will be downloaded as Root.cer and Server.cer, in this case I have renamed Root.cer as EZRADIUSRootCA.cer

Under Access Policies, you create a new policy: Policy Name: Wifi policy Match Certificate Attribute with Entra ID: Match with Entra ID Objects
Certificate type: Device
Certificate Name: Subject Alternative Name (DNS)
Device Identifier: Intune Device ID
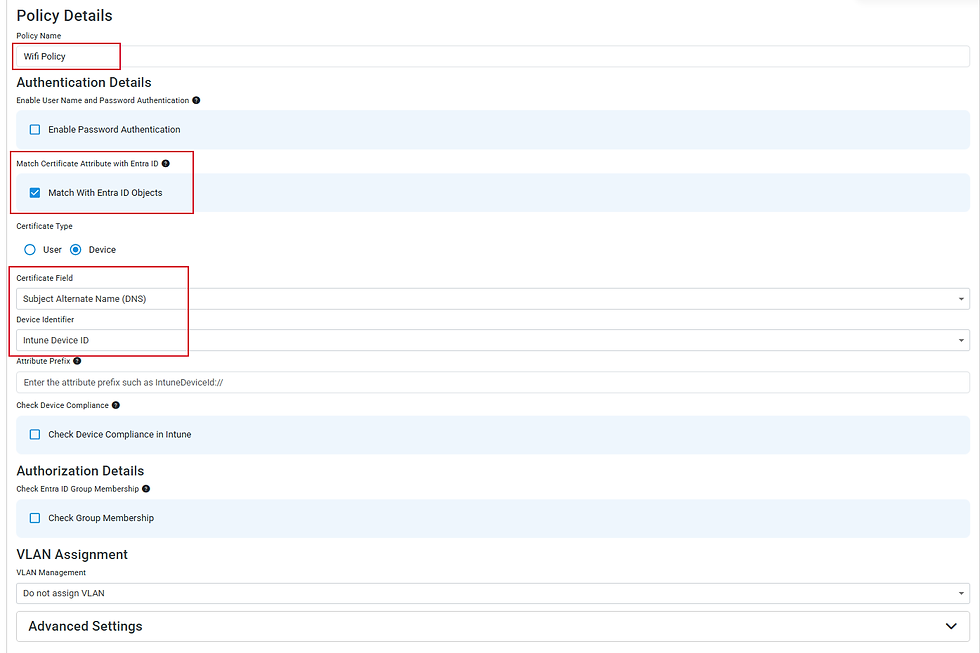
Make sure to navigate to the top of the page to select "Save Changes"

For Windows Create three 'Trusted Certificates' for Windows You will need to navigate to https://intune.microsoft.com/ then Devices then By platform: Windows then under Configuration then select Create then select New Policy then select Profile type: Windows 10 and later and Profile type: Templates: Trusted Certificate.
Profile name: Root CA Production
Certificate file: Root CA.cer
Destination store: Computer certificate store - Root
Profile name: Issuing CA Production
Certificate file: Iussing CA.cer
Destination store: Computer certificate store - Intermediate
Profile name: Keytos CA Production
Certificate file: EZRADIUSRootCA.cer
Destination store: Computer certificate store - Root

Create one 'SCEP Certificate' for Windows
You will need to navigate to https://intune.microsoft.com/ then Devices then By platform: Windows then under Configuration then select Create then select New Policy then select Profile type: Windows 10 and later and Profile type: Templates: SCEP certificate
Under Configuration settings, set the following:
Certificate type: Device
Subject name format: CN={{AAD_Device_ID}}
Subject altnerative name where: Attribute is DNS and Value is CN={{AAD_Device_ID}}
Certificate validity period is Years 1
Key storage: Enroll to Trusted Platform Module (TPM) KSP if present, otherwise Software KSP
Key usage: Digital signature and Key encipherment
Key size (bits): 2048
Hash algorithm: SHA-2
Root Certificate: Select it from the selection where it should be Root WiFi CA Production
Extended key usage: Name: Client Authentication
Object Identifier: 1.3.6.1.5.5.7.3.2
Predefined values: Not configured
Enrollment settings: 20%
SCEP Server URL: Copy and paste the URL from the Issuing CA

Create one 'Wi-Fi Certificate' for Windows
You will need to navigate to https://intune.microsoft.com/ then Devices then By platform: Windows then under Configuration then select Create then select New Policy then select Profile type: Windows 10 and later and Profile type: Templates: Wi-Fi
Under Configuration settings, set the following:
Wi-Fi type: Enterprise
Wi-Fi name (SSID): Enter SSID Name
Connection name: Enter SSID Name
Connect automatically when in range: Yes
Connect to more preferred network if available: No
Connect to this network, even when it is not broadcasting its SSID: No
Metered Connection Limit: Unrestricted
Authentication Mode: Machine
Remember credentials at each logon: Not Configured
Authentication period: Not Configured
Authentication retry delay period: Not Configured
Start period: Not Configured
Maximum EAPOL-start: Not Configured
Maximum authentication failures: Not Configured
Single sign-on (SSO): Disable
Enable pairwise master key (PMK) caching: No
Maximum time a PMK is stored in cache: Not Configured
Maximum number of PMK's stored in cache: Not Configured
Enable pre-authentication: No
Maximum pre-authentication attempts: Not Configured
EAP type: EAP-TLS
Server Trust: Certificate server names.
Open the Server.cer and go to Details, look for Subject Alternative name. The IP addresses need to be added into the Wi-Fi profile.

Root certificates for server validation: Select your Keytos CA Production
Authentication method: SCEP certificate
Client certificate for client authentication (Identity certificate): Select your SCEP Cert Production

Make sure to deploy all five profiles to your pilot group for testing.

For macOS
Create three 'Trusted Certificates' for macOS
You will need to navigate to https://intune.microsoft.com/ then Devices then By platform: macOS then under Configuration then select Create then select New Policy then select Profile type: macOS and Profile type: Templates: Trusted Certificate.
Profile name: Root CA Production
Deployment channel: Device channel
Certificate file: Root.cer
Profile name: Issuing CA Production
Deployment channel: Device channel
Certificate file: Issuing.cer
Profile name: Keytos CA Production
Deployment channel: Device channel
Certificate file: EZRADIUSRootCA.cer

Create one 'SCEP Certificate' for macOS
You will need to navigate to https://intune.microsoft.com/ then Devices then By platform: macOS then under Configuration then select Create then select New Policy then select Profile type: macOS and Profile type: Templates: SCEP certificate
Under Configuration settings, set the following:
Deployment Channel: Device Channel
Certificate type: Devicie
Subject name format: CN={{AAD_Device_ID}}
Subject altnerative name where: Attribute is DNS and Value is CN={{AAD_Device_ID}}
Certificate validity period is Years 1 Key usage: Digital signature, Key encipherment
Key size (bits): 4096
Root Certificate: Select it from the selection where it should be Root WiFi CA Production Extended key usage: Name: Client Authentication
Object Identifier: 1.3.6.1.5.5.7.3.2
Predefined values: Client Authentication
Key storage: Enroll to Trusted Platform Module (TPM) KSP if present, otherwise Software KSP Enrollment settings: 20%
SCEP Server URL: Copy and paste the URL from the Issuing CA
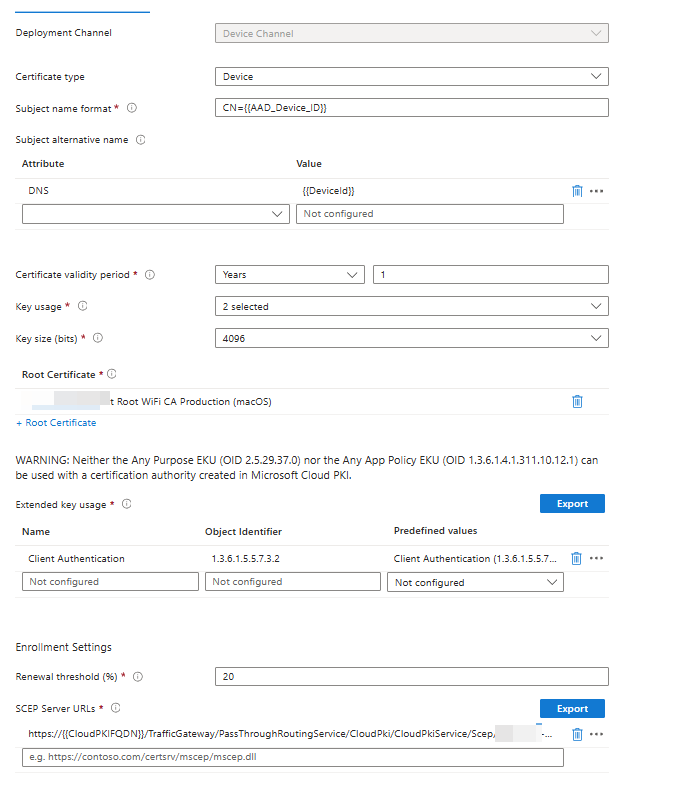
Note: The only thing to note for macOS SCEP, the key size (bits) needs to be set to 4096.
Create one 'Wi-Fi Certificate' for macOS
You will need to navigate to https://intune.microsoft.com/ then Devices then By platform: macOS then under Configuration then select Create then select New Policy then select Profile type: macOS and Profile type: Templates: Wi-Fi
Under Configuration settings, set the following:
Deployment Channel: Device Channel
Wi-Fi type: Enterprise
Wi-Fi name: Enter SSID Name
Connect automatically: Yes
Hidden network: Disable
EAP type: EAP - TLS
Server Trust: Certificate server names. Open the Server.cer and go to Details, look for Subject Alternative name. The IP addresses need to be added into the Wi-Fi profile.
Root certificates for server validation: Select your Keytos CA Production
Client certificate for client authentication (Identity certificate): Select your SCEP Cert Production Identity privacy (outer identity): Not configured
Proxy settings: None

Make sure to deploy all five profiles to your pilot group for testing.

To make sure it works, go to EZRadius Audit Logs and select Get Logs

On the devices, you will see that will instantly connect.


Comments